bestindianfoods Landing Page

Indian Foods Guide

Explore a wide range of Indian foods, Indian Cuisines and more Choosing the Right Indian food for you
bestindianfoods Service
>

Best Indian Food

Indian Food Recipes

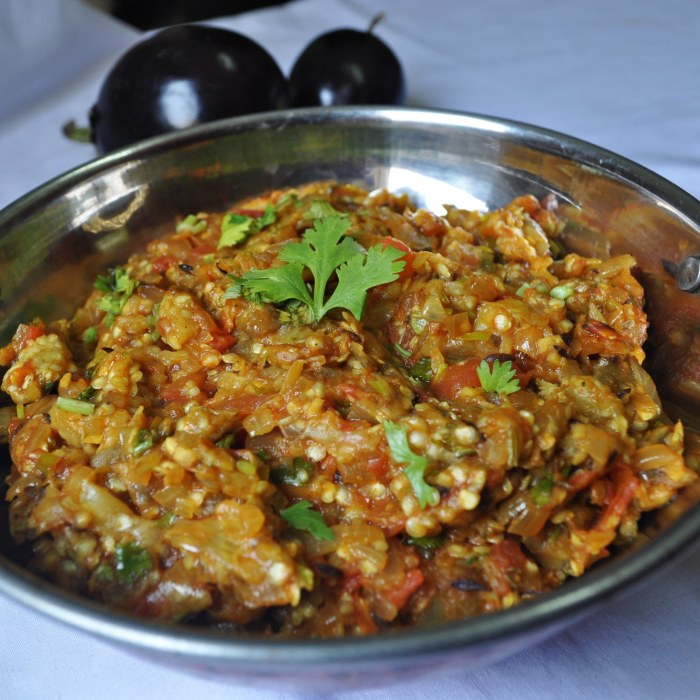
Baingan Bharta
Baingan Bharta
Ingredients:
  • Aubergine
  • Onion
  • Tomatoes
  • Garlic
  • Green Chilli
  • Red Chilli Powder
  • Oil
  • Coriander Leaves
  • salt
Cooking Instructions:

Rinse the baingan (eggplant or aubergine) in water. Pat dry with a kitchen napkin. Apply some oil all over and keep it for roasting on an open flame. You can also grill the baingan or roast in the oven. But then you won't get the smoky flavor of the baingan. Keep the eggplant turning after a 2 to 3 minutes on the flame, so that its evenly cooked. You could also embed some garlic cloves in the baingan and then roast it. 2. Roast the aubergine till its completely cooked and tender. With a knife check the doneness. The knife should slid easily in aubergines without any resistance. Remove the baingan and immerse in a bowl of water till it cools down. 3. You can also do the dhungar technique of infusing charcoal smoky flavor in the baingan. This is an optional step. Use natural charcoal for this method. Heat a small piece of charcoal on flame till it becomes smoking hot and red. 4. Make small cuts on the baingan with a knife. Place the red hot charcoal in the same plate where the roasted aubergine is kept. Add a few drops of oil on the charcoal. The charcoal would begin to smoke. 5. As soon as smoke begins to release from the charcoal, cover the entire plate tightly with a large bowl. Allow the charcoal smoke to get infused for 1 to 2 minutes. The more you do, the more smoky the baingan bharta will become. I just keep for a minute. Alternatively, you can also do this dhungar method once the baingan bharta is cooked, just like the way we do for Dal Tadka. 6. Peel the skin from the roasted and smoked eggplant. 7. Chop the cooked eggplant finely or you can even mash it. 8. In a kadai or pan, heat oil. Then add finely chopped onions and garlic. 9. Saute the onions till translucent. Don't brown them. 10. Add chopped green chilies and saute for a minute. 11. Add the chopped tomatoes and mix it well. 12. Bhuno (saute) the tomatoes till the oil starts separating from the mixture. 13. Now add the red chili powder. Stir and mix well. 14. Add the chopped cooked baingan. 15. Stir and mix the chopped baingan very well with the onion­tomato masala mixture. 16. Season with salt. Stir and saute for some more 4 to 5 minutes more. 17. Finally stir in the coriander leaves with the baingan bharta or garnish it with them. Serve Baingan Bharta with phulkas, rotis or chapatis. It goes well even with bread, toasted or grilled bread and plain rice or jeera rice.

Bread omelette
Bread omelette
Ingredients:
  • Bread
  • Egg
  • Salt
Cooking Instructions:

Make and enjoy
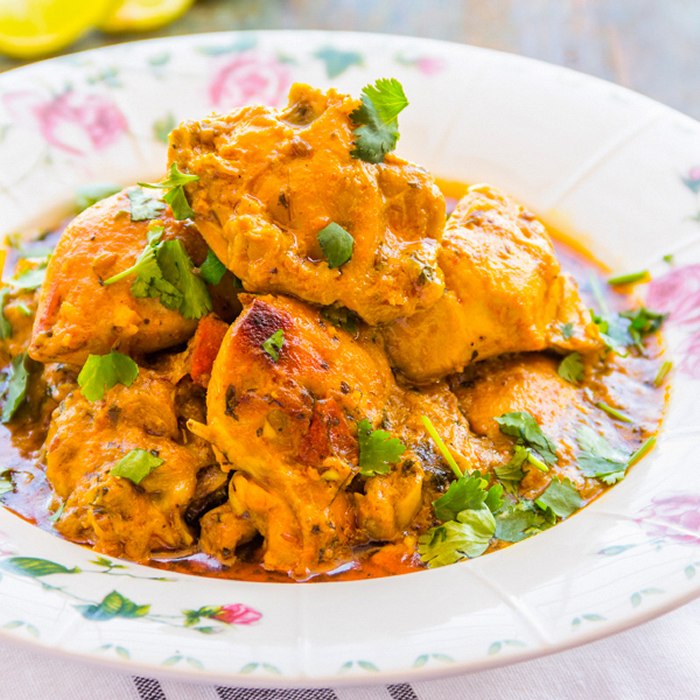
Chicken Handi
Chicken Handi
Ingredients:
  • Chicken
  • Onion
  • Tomatoes
  • Garlic
  • Ginger paste
  • Vegetable oil
  • Cumin seeds
  • Coriander seeds
  • Turmeric powder
  • Chilli powder
  • Green chilli
  • Yogurt
  • Cream
  • fenugreek
  • Garam masala
  • Salt
Cooking Instructions:

Take a large pot or wok, big enough to cook all the chicken, and heat the oil in it. Once the oil is hot, add sliced onion and fry them until deep golden brown. Then take them out on a plate and set aside. To the same pot, add the chopped garlic and sauté for a minute. Then add the chopped tomatoes and cook until tomatoes turn soft. This would take about 5 minutes. Then return the fried onion to the pot and stir. Add ginger paste and sauté well. Now add the cumin seeds, half of the coriander seeds and chopped green chillies. Give them a quick stir. Next goes in the spices – turmeric powder and red chilli powder. Sauté the spices well for couple of minutes. Add the chicken pieces to the wok, season it with salt to taste and cook the chicken covered on medium-low heat until the chicken is almost cooked through. This would take about 15 minutes. Slowly sautéing the chicken will enhance the flavor, so do not expedite this step by putting it on high heat. When the oil separates from the spices, add the beaten yogurt keeping the heat on lowest so that the yogurt doesn’t split. Sprinkle the remaining coriander seeds and add half of the dried fenugreek leaves. Mix well. Finally add the cream and give a final mix to combine everything well. Sprinkle the remaining kasuri methi and garam masala and serve the chicken handi hot with naan or rotis. Enjoy!
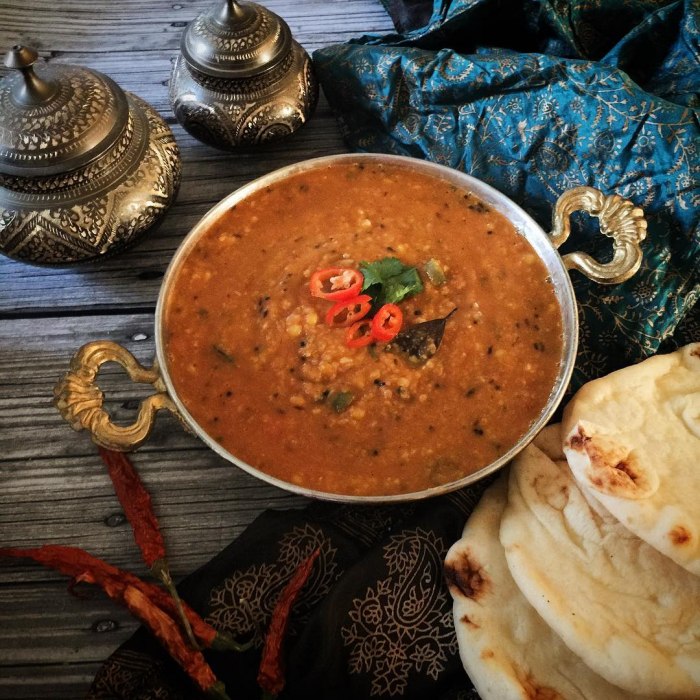
Dal fry
Dal fry
Ingredients:
  • Toor dal
  • Water
  • Salt
  • Turmeric
  • Ghee
  • Chopped tomatoes
  • Cumin seeds
  • Mustard Seeds
  • Bay Leaf
  • Green Chilli
  • Ginger
  • Cilantro
  • Red Pepper
  • Salt
  • Sugar
  • Garam Masala
Cooking Instructions:

Wash and soak toor dal in approx. 3 cups of water, for at least one hours. Dal will be double in volume after soaking. Drain the water. Cook dal with 2-1/2 cups water and add salt, turmeric, on medium high heat, until soft in texture (approximately 30 mins) it should be like thick soup. In a frying pan, heat the ghee. Add cumin seeds, and mustard seeds. After the seeds crack, add bay leaves, green chili, ginger and chili powder. Stir for a few seconds. Add tomatoes, salt and sugar stir and cook until tomatoes are tender and mushy. Add cilantro and garam masala cook for about one minute. Pour the seasoning over dal mix it well and cook for another minute. Serve with Naan.
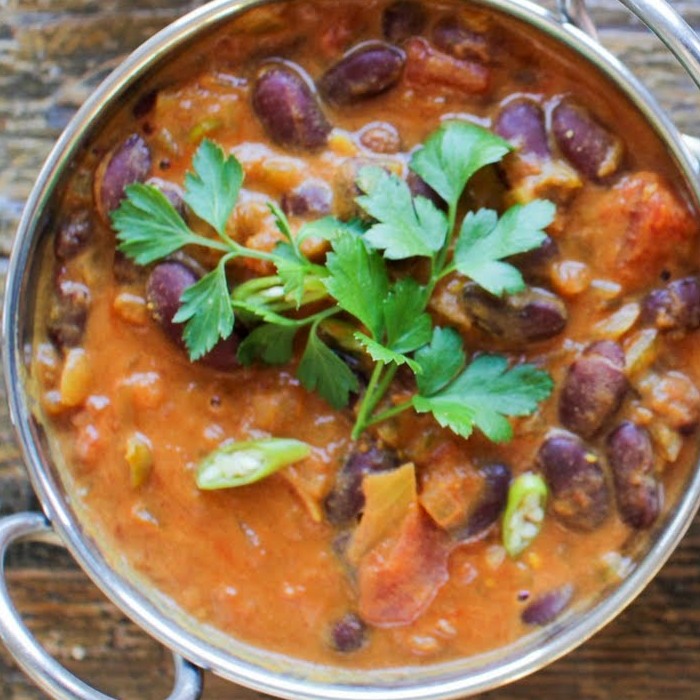
Kidney Bean Curry
Kidney Bean Curry
Ingredients:
  • Vegetable Oil
  • Onion
  • Garlic
  • Ginger
  • Coriander
  • Cumin
  • Paprika
  • Garam Masala
  • Chopped Tomatoes
  • Kidney Beans
  • Basmati Rice
Cooking Instructions:

Heat the oil in a large frying pan over a low-medium heat. Add the onion and a pinch of salt and cook slowly, stirring occasionally, until softened and just starting to colour. Add the garlic, ginger and coriander stalks and cook for a further 2 mins, until fragrant. Add the spices to the pan and cook for another 1 min, by which point everything should smell aromatic. Tip in the chopped tomatoes and kidney beans in their water, then bring to the boil. Turn down the heat and simmer for 15 mins until the curry is nice and thick. Season to taste, then serve with the basmati rice and the coriander leaves.
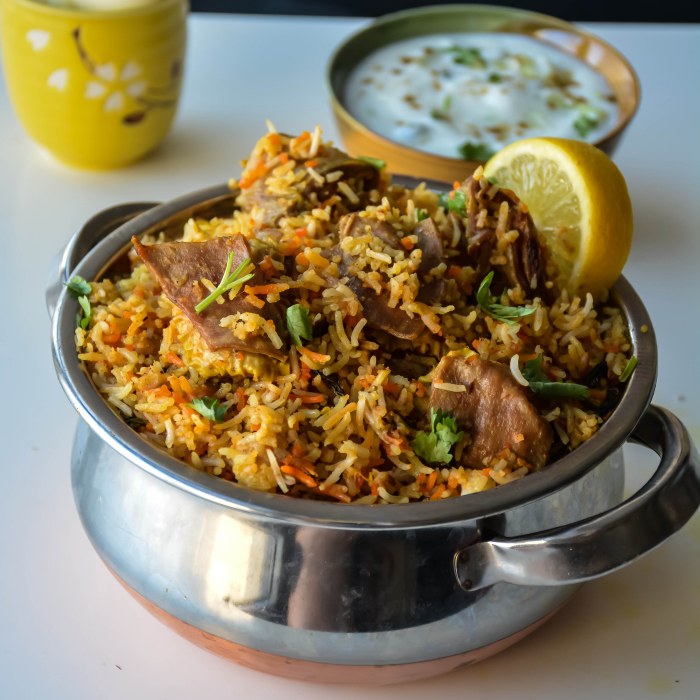
Lamb Biryani
Lamb Biryani
Ingredients:
  • Cashew nuts
  • Khus khus
  • Cumin seeds
  • Onions
  • Ginger garlic paste
  • Garlic
  • Mint
  • Cilantro
  • Saffron
  • Ghee
  • Basmati rice
  • Full fat yogurt
  • Cumin Seeds
  • Bay leaf
  • Cinnamon
  • Cloves
  • Cardamom
  • Lamb
  • Red Chilli powder
  • Biryani masala
Cooking Instructions:

Grind the cashew, poppy seeds and cumin seeds into a smooth paste, using as little water as possible. Set aside. Deep fry the sliced onions when it is hot. Don’t overcrowd the oil. When the onions turn light brown, remove from oil and drain on paper towel. The fried onion will crisp up as it drains. Also fry the cashewnuts till golden brown. Set aside. Wash the rice and soak in water for twenty minutes. Meanwhile, take a big wide pan, add oil in medium heat, add the sliced onions, add the blended paste, to it add the green chillies, ginger garlic paste and garlic and fry for a minute. Then add the tomatoes and sauté them well till they are cooked and not mushy. Then to it add the red chilli powder, biryani powder, mint, coriander leaves and sauté them well. Add the yogurt and mix well. I always move the skillet away from the heat when adding yogurt which prevents it from curdling. Now after returning the skillet back to the stove, add the washed lamb and salt and ½ cup water and mix well. Cook for 1 hour and cook it covered in medium low heat or put it in a pressure cooker for 6 whistles. If the water is not drained totally, heat it by keeping it open. Take another big pan, add thrice the cup of rice you use, and boil it. When it is boiling high, add the rice, salt and jeera and mix well. After 7 minutes exact or when the rice is 80% done. Switch off and drain the rice. Now, the layering starts. To the lamb, pat and level it. Add the drained hot rice on the top of it. Garnish with fried onions, ghee, mint, coriander leaves and saffron dissolved in milk. Cover the dish and bake in a 350f oven for 15 minutes or till the cooked but not mushy. Or cook in the stove medium heat for 12 minutes and lowest heat for 5 minutes. And switch off. Mix and serve hot! Notes 1. If you are cooking in oven, do make sure to cook in a big oven safe pan and cover it tight and then keep in oven for the final step. 2. You can skip biryani masala if you don’t have and add just garam masala (1 tsp and red chilli powder – 3 tsp instead of 1 tsp) 3. If it is spicy in the end, squeeze some lemon, it will reduce the heat and enhance the flavors also.
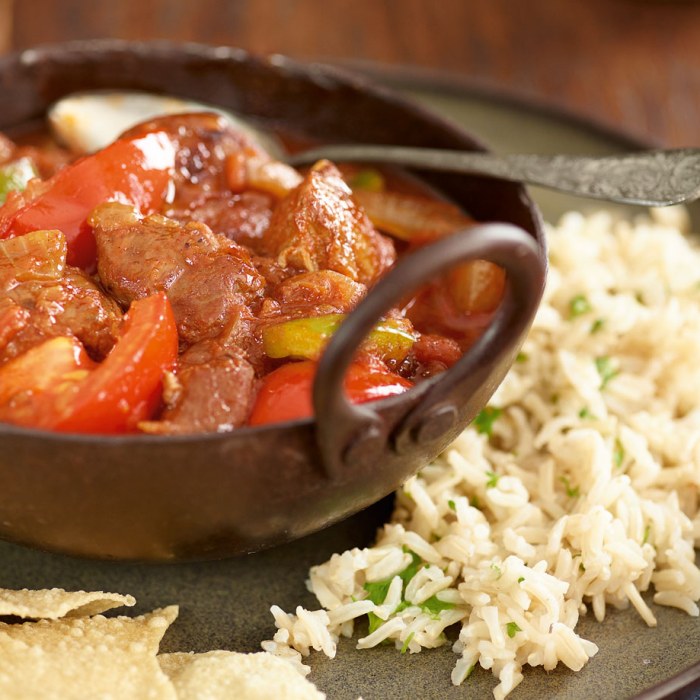
Lamb Rogan josh
Lamb Rogan josh
Ingredients:
  • Onion
  • Sunflower Oil
  • Garlic
  • Ginger
  • Madras Paste
  • Paprika
  • cinnamon stick
  • Cardamom
  • Cloves
  • Bay Leaf
  • Tomato Purée
  • Lamb
  • Greek yogurt
  • Coriander
Cooking Instructions:

Put the onions in a food processor and whizz until very finely chopped. Heat the oil in a large heavy-based pan, then fry the onion with the lid on, stirring every now and then, until it is really golden and soft. Add the garlic and ginger, then fry for 5 mins more. Tip the curry paste, all the spices and the bay leaves into the pan, with the tomato purée. Stir well over the heat for about 30 secs, then add the meat and 300ml water. Stir to mix, turn down the heat, then add the yogurt. Cover the pan, then gently simmer for 40-60 mins until the meat is tender and the sauce nice and thick. Serve scattered with coriander, with plain basmati or pilau rice.
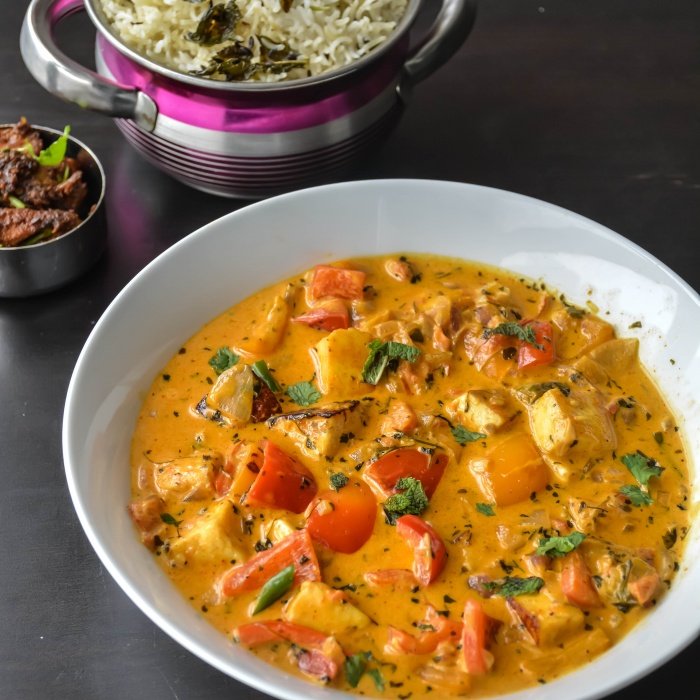
Matar Paneer
Matar Paneer
Ingredients:
  • Sunflower Oil
  • Paneer
  • Ginger
  • Cumin
  • Turmeric
  • Coriander
  • Green Chilli
  • Tomato
  • Peas
  • Garam Masala
  • Coriander
  • Naan Bread
Cooking Instructions:

Heat the oil in a frying pan over high heat until it’s shimmering hot. Add the paneer, then turn the heat down a little. Fry until it starts to brown at the edges, then turn it over and brown on each side – the paneer will brown faster than you think, so don’t walk away. Remove the paneer from the pan and drain on kitchen paper. Put the ginger, cumin, turmeric, ground coriander and chilli in the pan, and fry everything for 1 min. Add the tomatoes, mashing them with the back of a spoon and simmer everything for 5 mins until the sauce smells fragrant. Add a splash of water if it’s too thick. Season well. Add the peas and simmer for a further 2 mins, then stir in the paneer and sprinkle over the garam masala. Divide between two bowls, top with coriander leaves and serve with naan bread, roti or rice.
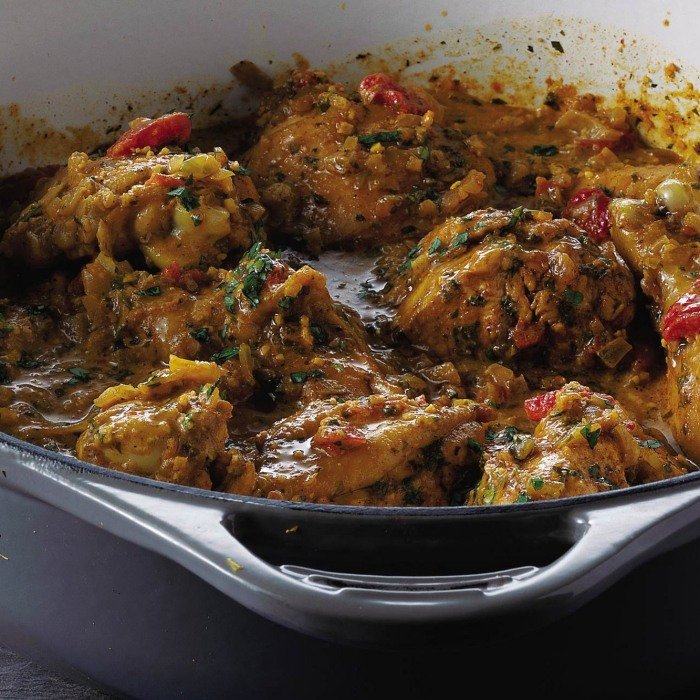
Nutty Chicken Curry
Nutty Chicken Curry
Ingredients:
  • Red Chilli
  • Ginger
  • Garlic
  • Coriander
  • Sunflower Oil
  • Chicken Breasts
  • Peanut Butter
  • Chicken Stock
  • Greek Yogurt
Cooking Instructions:

Finely slice a quarter of the chilli, then put the rest in a food processor with the ginger, garlic, coriander stalks and one-third of the leaves. Whizz to a rough paste with a splash of water if needed. Heat the oil in a frying pan, then quickly brown the chicken chunks for 1 min. Stir in the paste for another min, then add the peanut butter, stock and yogurt. When the sauce is gently bubbling, cook for 10 mins until the chicken is just cooked through and sauce thickened. Stir in most of the remaining coriander, then scatter the rest on top with the chilli, if using. Eat with rice or mashed sweet potato.
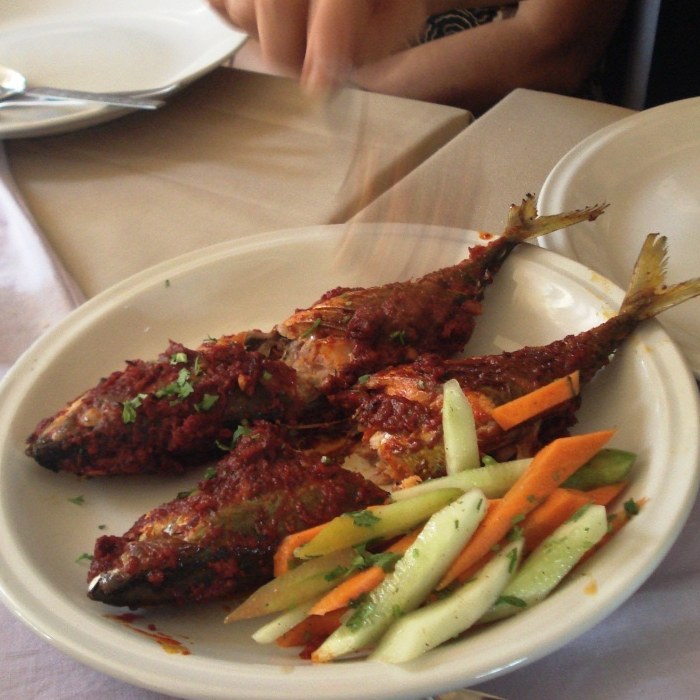
Recheado Masala Fish
Ingredients:
  • Mackerel
  • Red Chilli
  • Ginger
  • Garlic
  • Pepper
  • Cumin
  • Turmeric
  • Cinnamon stick
  • Cloves
  • Cardamom
  • Sugar
  • Tamarind ball
  • Vinegar
  • Oil
Cooking Instructions:

Soak all the spices, ginger, garlic, tamarind pulp and kashmiri chilies except oil in vinegar. Add sugar and salt. Also add turmeric powder. Combine all nicely and marinate for 35-40 mins. Grind the mixture until soft and smooth. Add more vinegar if required but ensure the paste has to be thick so add vinegar accordingly. If the masala paste is thin then it would not stick to the fish. Rinse the fish slit from the center and give some incision from the top. You could see the fish below for clarity. Now stuff the paste into the center and into the incision. Coat the entire fish with this paste. Marinate the fish for 30 mins. Place oil in a shallow pan, once oil is quite hot shallow fry the stuffed mackerels. Fry until golden brown from both sides Serve the recheado mackerels hot with salad, lime wedges, rice and curry. Notes 1. Ensure the masala paste is thick else the result won't be good. 2. If you aren't able to find kashmiri chilies then use bedgi chilies or kashmiri red chili powder. 3. You could use white vinegar or coconut vinegar. 4. Any left over paste could be stored in the fridge for future use. 5. Cinnamon could be avoided as it's a strong spice used generally for meat or chicken.
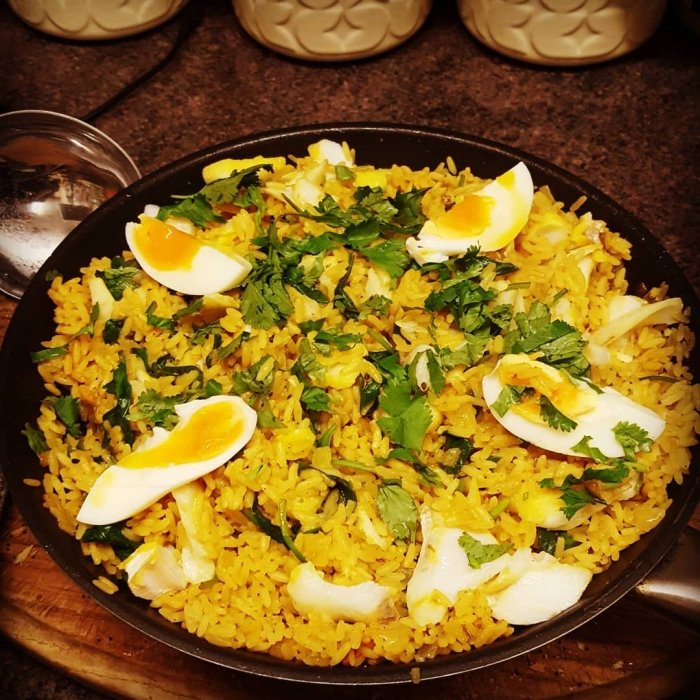
Smoked Haddock Kedgeree
Ingredients:
  • Butter
  • Onion
  • Cardamom
  • Turmeric
  • Cinnamon Stick
  • Bay Leaf
  • Basmati Rice
  • Chicken Stock
  • Smoked Haddock
  • Eggs
  • Parsley
  • Lemon
Cooking Instructions:

Melt 50g butter in a large saucepan (about 20cm across), add 1 finely chopped medium onion and cook gently over a medium heat for 5 minutes, until softened but not browned. Stir in 3 split cardamom pods, ¼ tsp turmeric, 1 small cinnamon stick and 2 bay leaves, then cook for 1 minute. Tip in 450g basmati rice and stir until it is all well coated in the spicy butter. Pour in 1 litre chicken or fish stock, add ½ teaspoon salt and bring to the boil, stir once to release any rice from the bottom of the pan. Cover with a close-fitting lid, reduce the heat to low and leave to cook very gently for 12 minutes. Meanwhile, bring some water to the boil in a large shallow pan. Add 750g un-dyed smoked haddock fillet and simmer for 4 minutes, until the fish is just cooked. Lift it out onto a plate and leave until cool enough to handle. Hard-boil 3 eggs for 8 minutes. Flake the fish, discarding any skin and bones. Drain the eggs, cool slightly, then peel and chop.
 Uncover the rice and remove the bay leaves, cinnamon stick and cardamom pods if you wish to. Gently fork in the fish and the chopped eggs, cover again and return to the heat for 2-3 minutes, or until the fish has heated through. Gently stir in almost all the 3 tbsp chopped fresh parsley, and season with a little salt and black pepper to taste. Serve scattered with the remaining parsley and garnished with 1 lemon, cut into wedges.
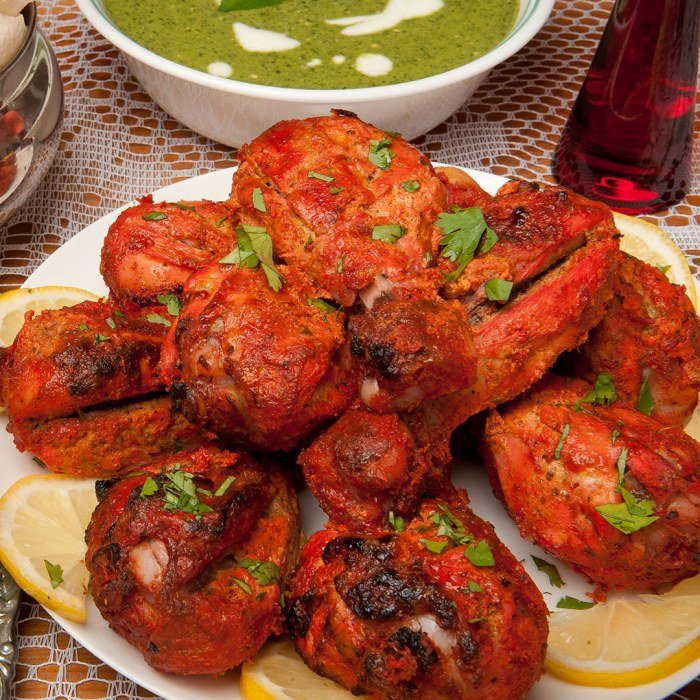
Tandoori chicken
Tandoori chicken
Ingredients:
  • lemons
  • paprika
  • red onions
  • chicken thighs
  • vegetable oil
  • Greek yogurt
  • ginger
  • garlic clove
  • garam masala
  • ground cumin
  • chilli powder
  • turmeric
Cooking Instructions:

Mix the lemon juice with the paprika and red onions in a large shallow dish. Slash each chicken thigh three times, then turn them in the juice and set aside for 10 mins. Mix all of the marinade ingredients together and pour over the chicken. Give everything a good mix, then cover and chill for at least 1 hr. This can be done up to a day in advance. Heat the grill. Lift the chicken pieces onto a rack over a baking tray. Brush over a little oil and grill for 8 mins on each side or until lightly charred and completely cooked through.

This website uses cookies to ensure you get the best experience on our website. By clicking "Accept", you agree to our use of cookies. Learn more

×
Useful links
Home Curry Dishes Biryani Dishes Tandoori Dishes
Indian Cuisuine Indian Foods Vegetarian Dishes Samosas and Chaats Masala Dishes
Socials
Facebook Instagram Twitter Telegram
Help & Support
Contact About Us Write for Us


1 year ago
Exploring the Delightful Delicacy of Dahi Puri Chaat: A Burst of Flavors from India

Exploring the Delightful Delicacy of Dahi Puri Chaat: A Burst of Flavors from India

Read More →
1 year ago
Indulge in the Exquisite Flavors of Indian Street Food: Tikki Chole Chaat

Indulge in the Exquisite Flavors of Indian Street Food: Tikki Chole Chaat

Read More →
1 year ago
The Mouthwatering Delight: Chole Samosa Chaat

The Mouthwatering Delight: Chole Samosa Chaat

Read More →
1 year ago
Exploring the Delectable World of Ragda Patties was delicious and satisfying.

Exploring the Delectable World of Ragda Patties was delicious and satisfying.

Read More →
1 year ago
Exploring the Delights of Kachori Chaat: A Perfect Blend of Flavors and Textures from India

Exploring the Delights of Kachori Chaat: A Perfect Blend of Flavors and Textures from India

Read More →

Dosa Dishes

1 year ago
Rajma Biryani - A Burst of Flavors from the Heart of India

Rajma Biryani - A Burst of Flavors from the Heart of India

Read More →
1 year ago
Discover the Irresistible Flavors of Mughlai Biryani - A Signature Dish from India

Discover the Irresistible Flavors of Mughlai Biryani - A Signature Dish from India

Read More →
1 year ago
Unveiling the Flavors of Bombay Biryani: India's Culinary Delight

Unveiling the Flavors of Bombay Biryani: India's Culinary Delight

Read More →
1 year ago
Exploring the Culinary Delight: Malabar Biryani - A Taste of India

Exploring the Culinary Delight: Malabar Biryani - A Taste of India

Read More →
1 year ago
Ambur Biryani: A Delectable Delight from the Heart of South India

Ambur Biryani: A Delectable Delight from the Heart of South India

Read More →

Paneer Dishes

1 year ago
The traditional Indian dish is delicious and has a lot of flavor.

The traditional Indian dish is delicious and has a lot of flavor.

Read More →
1 year ago
Exploring the flavors of Saag Paneer is a delicious and healthy activity.

Exploring the flavors of Saag Paneer is a delicious and healthy activity.

Read More →
1 year ago
The Splendor of Masoor Dal: A Journey into the World of Indian Cuisine

The Splendor of Masoor Dal: A Journey into the World of Indian Cuisine

Read More →
1 year ago
Exploring the Delights of Aloo Gobi: A Staple Indian Dish

Exploring the Delights of Aloo Gobi: A Staple Indian Dish

Read More →
1 year ago
Delight Your Taste Buds with the Creamy Goodness of Malai Kofta

Delight Your Taste Buds with the Creamy Goodness of Malai Kofta

Read More →

Kebab Dishes

1 year ago
Exploring the Exquisite Flavors of Goan Curry: A Culinary Journey to India's Coastal Gem

Exploring the Exquisite Flavors of Goan Curry: A Culinary Journey to India's Coastal Gem

Read More →
1 year ago
Exploring the Rich and Flavorful World of Indian Foods: The Balti Curry Experience

Exploring the Rich and Flavorful World of Indian Foods: The Balti Curry Experience

Read More →
1 year ago
Exploring the Bold and Spicy Flavors of Jalfrezi Curry: A Traditional Indian Delight

Exploring the Bold and Spicy Flavors of Jalfrezi Curry: A Traditional Indian Delight

Read More →
1 year ago
Exploring the Rich Flavors of Indian Cuisine: Madras Curry

Exploring the Rich Flavors of Indian Cuisine: Madras Curry

Read More →
1 year ago
Exploring the Spicy Delight of Vindaloo Curry in Indian Cuisine

Exploring the Spicy Delight of Vindaloo Curry in Indian Cuisine

Read More →
1 year ago
Exploring the Exquisite Flavors of Rogan Josh Curry - A Delightful Indian Culinary Experience

Exploring the Exquisite Flavors of Rogan Josh Curry - A Delightful Indian Culinary Experience

Read More →
1 year ago
Discover the Flavors of India with Delicious Korma Curry

Discover the Flavors of India with Delicious Korma Curry

Read More →
1 year ago
Exploring the Flavorful World of Indian Foods: Unravel the Secrets of Spicy Curry

Exploring the Flavorful World of Indian Foods: Unravel the Secrets of Spicy Curry

Read More →
1 year ago
Exploring the Richness of Indian Cuisine: Indulging in Creamy Curries

Exploring the Richness of Indian Cuisine: Indulging in Creamy Curries

Read More →
1 year ago
Exploring the Vibrant World of Tomato-Based Curries in Indian Cuisine

Exploring the Vibrant World of Tomato-Based Curries in Indian Cuisine

Read More →

Desserts and Sweets

1 year ago
Rajma Biryani - A Burst of Flavors from the Heart of India

Rajma Biryani - A Burst of Flavors from the Heart of India

Read More →
1 year ago
Discover the Irresistible Flavors of Mughlai Biryani - A Signature Dish from India

Discover the Irresistible Flavors of Mughlai Biryani - A Signature Dish from India

Read More →
1 year ago
Unveiling the Flavors of Bombay Biryani: India's Culinary Delight

Unveiling the Flavors of Bombay Biryani: India's Culinary Delight

Read More →
1 year ago
Exploring the Culinary Delight: Malabar Biryani - A Taste of India

Exploring the Culinary Delight: Malabar Biryani - A Taste of India

Read More →
1 year ago
Ambur Biryani: A Delectable Delight from the Heart of South India

Ambur Biryani: A Delectable Delight from the Heart of South India

Read More →
1 year ago
The Flavors of South India: Exploring the Delectable Chettinad Biryani

The Flavors of South India: Exploring the Delectable Chettinad Biryani

Read More →
1 year ago
Exploring the Essence of Lucknowi Biryani - A Culinary Journey to India

Exploring the Essence of Lucknowi Biryani - A Culinary Journey to India

Read More →
1 year ago
Kolkata Biryani: A Gastronomic Delight from the Streets of India

Kolkata Biryani: A Gastronomic Delight from the Streets of India

Read More →
1 year ago
Awadhi Biryani: The Flavorsome Delicacy from India

Awadhi Biryani: The Flavorsome Delicacy from India

Read More →
1 year ago
Exploring the World of Indian Foods is a delicious and delicious meal.

Exploring the World of Indian Foods is a delicious and delicious meal.

Read More →

Lentil and Legume Dishes

1 year ago
Exploring the Delicious World of Indian Foods: Chana Dal

Exploring the Delicious World of Indian Foods: Chana Dal

Read More →
1 year ago
Delve Into the Flavors of India with Methi Dal: A Nutritious and Delicious Dish Introduction: Indian cuisine is known for its rich and intricate flavors, and one dish that exemplifies this culinary tradition is Methi Dal. Packed with the goodness of lentils and the distinct flavor of fenugreek leaves, Methi Dal is a simple yet satisfying dish that is a staple in many Indian households. In this blog post, we will explore the origins of Methi Dal, its health benefits, and a delicious recipe to help you recreate this delightful dish in your own kitchen. Origin of Methi Dal: Methi Dal is believed to have originated in the Indian subcontinent and has been a part of Indian cuisine for centuries. Methi, also known as fenugreek, is a common herb used in Indian cooking and adds a unique and slightly bitter taste to dishes. Its leaves are packed with nutrients, making it a popular choice in many Indian recipes. When combined with lentils, Methi Dal becomes a wholesome and nutritious meal option. Health Benefits of Methi Dal: 1. Rich in protein: Lentils are a fantastic source of plant-based protein, making Methi Dal an excellent choice for vegetarians and vegans looking to add more protein to their diet. 2. High in dietary fiber: Lentils are also a great source of dietary fiber, which aids digestion and helps maintain a healthy weight. 3. Packed with vitamins and minerals: Methi leaves are rich in vitamins A, C, and K, as well as minerals like iron, calcium, and potassium. These nutrients help boost immunity and support overall health. 4. Blood sugar control: The soluble fiber in lentils helps regulate blood sugar levels, making Methi Dal a suitable choice for individuals with diabetes. 5. Supports heart health: The combination of lentils and fenugreek leaves in Methi Dal is known to promote heart health by reducing cholesterol levels and improving overall cardiovascular function. Recipe: Methi Dal Ingredients: - 1 cup split yellow lentils (moong dal) - 1 cup fenugreek leaves (methi leaves) - 1 onion, finely chopped - 2 tomatoes, finely chopped - 2 cloves of garlic, minced - 1-inch piece of ginger, grated - 1 tsp cumin seeds - 1 tsp turmeric powder - 1 tsp red chili powder (adjust as per taste) - Salt to taste - 2 tbsp ghee or oil - Fresh coriander leaves for garnishing Instructions: 1. Wash the lentils thoroughly and soak them in water for 30 minutes. Drain and set aside. 2. Heat ghee or oil in a large saucepan and add cumin seeds. Let them sizzle for a few seconds. 3. Add chopped onions, minced garlic, and grated ginger to the pan. Sauté until the onions turn golden brown. 4. Add chopped tomatoes, turmeric powder, red chili powder, and salt. Cook until the tomatoes become soft and mushy. 5. Add the soaked lentils to the pan and mix well. Add enough water to cover the lentils and bring the mixture to a boil. 6. Reduce the heat to low, cover the pan, and let the lentils cook for about 20-25 minutes or until they become soft and mushy. 7. In the meantime, wash the fenugreek leaves thoroughly and finely chop them. 8. Once the lentils are cooked, add the chopped fenugreek leaves to the pan and cook for another 5 minutes. 9. Adjust the consistency by adding more water if needed. Simmer for a few minutes until the flavors are well blended. 10. Garnish with fresh coriander leaves and serve hot with rice or Indian bread of your choice. Conclusion: Methi Dal is a delightful, nutritious, and easy-to-make

Delve Into the Flavors of India with Methi Dal: A Nutritious and Delicious Dish Introduction: Indian cuisine is known for its rich and intricate flavors, and one dish that exemplifies this culinary tradition is Methi Dal. Packed with the goodness of lentils and the distinct flavor of fenugreek leaves, Methi Dal is a simple yet satisfying dish that is a staple in many Indian households. In this blog post, we will explore the origins of Methi Dal, its health benefits, and a delicious recipe to help you recreate this delightful dish in your own kitchen. Origin of Methi Dal: Methi Dal is believed to have originated in the Indian subcontinent and has been a part of Indian cuisine for centuries. Methi, also known as fenugreek, is a common herb used in Indian cooking and adds a unique and slightly bitter taste to dishes. Its leaves are packed with nutrients, making it a popular choice in many Indian recipes. When combined with lentils, Methi Dal becomes a wholesome and nutritious meal option. Health Benefits of Methi Dal: 1. Rich in protein: Lentils are a fantastic source of plant-based protein, making Methi Dal an excellent choice for vegetarians and vegans looking to add more protein to their diet. 2. High in dietary fiber: Lentils are also a great source of dietary fiber, which aids digestion and helps maintain a healthy weight. 3. Packed with vitamins and minerals: Methi leaves are rich in vitamins A, C, and K, as well as minerals like iron, calcium, and potassium. These nutrients help boost immunity and support overall health. 4. Blood sugar control: The soluble fiber in lentils helps regulate blood sugar levels, making Methi Dal a suitable choice for individuals with diabetes. 5. Supports heart health: The combination of lentils and fenugreek leaves in Methi Dal is known to promote heart health by reducing cholesterol levels and improving overall cardiovascular function. Recipe: Methi Dal Ingredients: - 1 cup split yellow lentils (moong dal) - 1 cup fenugreek leaves (methi leaves) - 1 onion, finely chopped - 2 tomatoes, finely chopped - 2 cloves of garlic, minced - 1-inch piece of ginger, grated - 1 tsp cumin seeds - 1 tsp turmeric powder - 1 tsp red chili powder (adjust as per taste) - Salt to taste - 2 tbsp ghee or oil - Fresh coriander leaves for garnishing Instructions: 1. Wash the lentils thoroughly and soak them in water for 30 minutes. Drain and set aside. 2. Heat ghee or oil in a large saucepan and add cumin seeds. Let them sizzle for a few seconds. 3. Add chopped onions, minced garlic, and grated ginger to the pan. Sauté until the onions turn golden brown. 4. Add chopped tomatoes, turmeric powder, red chili powder, and salt. Cook until the tomatoes become soft and mushy. 5. Add the soaked lentils to the pan and mix well. Add enough water to cover the lentils and bring the mixture to a boil. 6. Reduce the heat to low, cover the pan, and let the lentils cook for about 20-25 minutes or until they become soft and mushy. 7. In the meantime, wash the fenugreek leaves thoroughly and finely chop them. 8. Once the lentils are cooked, add the chopped fenugreek leaves to the pan and cook for another 5 minutes. 9. Adjust the consistency by adding more water if needed. Simmer for a few minutes until the flavors are well blended. 10. Garnish with fresh coriander leaves and serve hot with rice or Indian bread of your choice. Conclusion: Methi Dal is a delightful, nutritious, and easy-to-make

Read More →
1 year ago
Dum Aloo: A Delightful Indian Cuisine

Dum Aloo: A Delightful Indian Cuisine

Read More →
1 year ago
Baingan Bharta: A Classic Indian Dish Bursting with Flavors

Baingan Bharta: A Classic Indian Dish Bursting with Flavors

Read More →
1 year ago
The classic Indian dish is delicious and wholesome.

The classic Indian dish is delicious and wholesome.

Read More →
1 year ago
Unveiling the Flavors of India: Exploring the Irresistible Pav Bhaji Introduction: Indian cuisine is renowned for its rich and diverse flavors, and one dish that perfectly embodies this culinary tradition is the delectable Pav Bhaji. Originating from the bustling streets of Mumbai, this iconic street food has found its way into the hearts and taste buds of food lovers around the world. In this blog post, we will take a closer look at the mouthwatering Pav Bhaji, its history, preparation, and the unforgettable experience it offers. History and Significance: Pav Bhaji dates back to the 1850s, where it was initially created as a quick and convenient meal for textile mill workers in Mumbai. It gradually gained popularity and soon became a favorite amongst locals and visitors alike. The term "Pav" refers to the soft, pillowy bread rolls, while "Bhaji" represents the rich and flavorful vegetable curry. This unique combination of spiced mashed vegetables served with buttered pav became an instant hit, and today, it has become a beloved street food and a must-try dish for anyone exploring the vibrant culinary landscape of India. Preparation and Ingredients: Traditional Pav Bhaji is made by mashing a variety of vegetables such as potatoes, tomatoes, carrots, peas, and capsicum, along with a selection of fragrant spices. The vegetables are cooked until soft and blended together to create a thick curry-like consistency. This delicious mixture is then generously served with butter-slathered pav or soft bread rolls, along with a garnish of chopped onions, coriander leaves, and a squeeze of lemon juice. The Pav Bhaji masala, a blend of various spices, including coriander, cumin, turmeric, red chili powder, and fennel seeds, adds an incredible depth of flavor to the dish. The Unforgettable Experience: Eating Pav Bhaji is not just a meal; it is an experience that engages all your senses. The aroma of freshly roasted spices fills the air, teasing your taste buds and creating an anticipation of flavors to come. As you take your first bite, the explosion of flavors dances on your palate, from the tanginess of tomatoes to the warmth of spices, intermingling with the creaminess of the mashed vegetables. The softness of the pav contrasts perfectly with the rich and robust curry, creating a harmonious blend of textures that will leave you craving more. The dish is often served with a side of tangy and spicy pickles, adding an extra kick to every bite. Variations and Modern Twists: While the traditional Pav Bhaji recipe remains immensely popular, chefs and home cooks have also experimented with various variations and creative twists. Some prefer adding additional vegetables such as cauliflower or beetroot, while others introduce a hint of sweetness with a dash of sugar or jaggery. A North Indian version called Paneer Pav Bhaji incorporates the addition of paneer (Indian cottage cheese), adding a creamy and cheesy element to the dish. The modern culinary landscape has also seen fusion variations like Cheese Pav Bhaji, Masala Pav Sliders, or even Pav Bhaji Pizza, showcasing the versatility and adaptability of this beloved street food. Conclusion: Pav Bhaji is a true delight for food lovers seeking a taste of authentic Indian cuisine. With its humble origins and explosive flavors, this street food has become a global sensation, captivating the taste buds of millions. Whether enjoyed at a bustling street vendor's stall or recreated in the comfort of your own kitchen, Pav Bhaji embodies the essence of Indian culinary culture and leaves an indelible mark on anyone fortunate enough to savor its delights. So, the next time you want to embark on a flavorsome adventure, don't forget

Unveiling the Flavors of India: Exploring the Irresistible Pav Bhaji Introduction: Indian cuisine is renowned for its rich and diverse flavors, and one dish that perfectly embodies this culinary tradition is the delectable Pav Bhaji. Originating from the bustling streets of Mumbai, this iconic street food has found its way into the hearts and taste buds of food lovers around the world. In this blog post, we will take a closer look at the mouthwatering Pav Bhaji, its history, preparation, and the unforgettable experience it offers. History and Significance: Pav Bhaji dates back to the 1850s, where it was initially created as a quick and convenient meal for textile mill workers in Mumbai. It gradually gained popularity and soon became a favorite amongst locals and visitors alike. The term "Pav" refers to the soft, pillowy bread rolls, while "Bhaji" represents the rich and flavorful vegetable curry. This unique combination of spiced mashed vegetables served with buttered pav became an instant hit, and today, it has become a beloved street food and a must-try dish for anyone exploring the vibrant culinary landscape of India. Preparation and Ingredients: Traditional Pav Bhaji is made by mashing a variety of vegetables such as potatoes, tomatoes, carrots, peas, and capsicum, along with a selection of fragrant spices. The vegetables are cooked until soft and blended together to create a thick curry-like consistency. This delicious mixture is then generously served with butter-slathered pav or soft bread rolls, along with a garnish of chopped onions, coriander leaves, and a squeeze of lemon juice. The Pav Bhaji masala, a blend of various spices, including coriander, cumin, turmeric, red chili powder, and fennel seeds, adds an incredible depth of flavor to the dish. The Unforgettable Experience: Eating Pav Bhaji is not just a meal; it is an experience that engages all your senses. The aroma of freshly roasted spices fills the air, teasing your taste buds and creating an anticipation of flavors to come. As you take your first bite, the explosion of flavors dances on your palate, from the tanginess of tomatoes to the warmth of spices, intermingling with the creaminess of the mashed vegetables. The softness of the pav contrasts perfectly with the rich and robust curry, creating a harmonious blend of textures that will leave you craving more. The dish is often served with a side of tangy and spicy pickles, adding an extra kick to every bite. Variations and Modern Twists: While the traditional Pav Bhaji recipe remains immensely popular, chefs and home cooks have also experimented with various variations and creative twists. Some prefer adding additional vegetables such as cauliflower or beetroot, while others introduce a hint of sweetness with a dash of sugar or jaggery. A North Indian version called Paneer Pav Bhaji incorporates the addition of paneer (Indian cottage cheese), adding a creamy and cheesy element to the dish. The modern culinary landscape has also seen fusion variations like Cheese Pav Bhaji, Masala Pav Sliders, or even Pav Bhaji Pizza, showcasing the versatility and adaptability of this beloved street food. Conclusion: Pav Bhaji is a true delight for food lovers seeking a taste of authentic Indian cuisine. With its humble origins and explosive flavors, this street food has become a global sensation, captivating the taste buds of millions. Whether enjoyed at a bustling street vendor's stall or recreated in the comfort of your own kitchen, Pav Bhaji embodies the essence of Indian culinary culture and leaves an indelible mark on anyone fortunate enough to savor its delights. So, the next time you want to embark on a flavorsome adventure, don't forget

Read More →
1 year ago
Exploring the Delights of Indian Cuisine: Aloo Gobi Matar

Exploring the Delights of Indian Cuisine: Aloo Gobi Matar

Read More →
1 year ago
Delight Your Taste Buds with the Lip-Smacking Kadhi Pakoda: A Classic Indian Delicacy

Delight Your Taste Buds with the Lip-Smacking Kadhi Pakoda: A Classic Indian Delicacy

Read More →
1 year ago
Exploring the Delicious and Nutritious Moong Dal Khichdi from India

Exploring the Delicious and Nutritious Moong Dal Khichdi from India

Read More →
1 year ago
Experience the Delightful Trio: Dal Baati Churma - A Unique Indian Culinary Delight

Experience the Delightful Trio: Dal Baati Churma - A Unique Indian Culinary Delight

Read More →